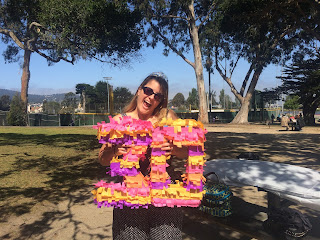
Our dear crafting friend, C, recently turned 30.
To celebrate, we made her a birthday pinata to commemorate the milestone!
To celebrate, we made her a birthday pinata to commemorate the milestone!
what you need:
cardboard (we used some ikea boxes from a recent furniture purchase)
ruler
pencil
heavy duty scissors, or exacto knife
shipping or painters tape
tissue paper of varying colors
runny glue or mod podge
you will first be making a 3D number (or letter, or whatever shape you want!).
you could print something out and trace it, or free hand it.
cut out two of the same shape.
cut a long strip of cardboard for the thickness of the pinata (we did a 3" strip).
place one of your cutouts on a flat surface, and begin taping the strip of cardboard perpendicular to the shape, placing tape as you go to secure it. once you have added the strip of cardboard, tape your other cardboard shape to the top. this should give you a 3D shape.
place one of your cutouts on a flat surface, and begin taping the strip of cardboard perpendicular to the shape, placing tape as you go to secure it. once you have added the strip of cardboard, tape your other cardboard shape to the top. this should give you a 3D shape.
cut your tissue paper into strips, and give it some thick fringe. starting from the bottom, glue the tissue paper to the shape, with a bit of overlap.
cover the entire pinata! for flat surfaces that are visible, you can either add fringed or flat tissue paper to cover the cardboard.
the final product!
we didn't fill our pinatas with candy, but i would recommend putting something inside if you are planning on being outside. we used ours as the centerpiece at the birthday picnic, and the wind kept blowing them over (so some weight inside would have been helpful!)
BONUS: cut out a word or phrase with your extra cardboard, spray paint it, and add toothpicks for a fun and custom cake (or cupcake) topper!


0 comments:
Post a Comment