

Check out this awesome tutorial from Teal Jensen, a recent Nursing School grad, super talented painter, native San Diego surfer girl, and overall creative genius. Thanks for sharing, Tealita!
I’m from a town that takes lots of pride in celebrating their Independence. So this
year when the 4th rolled around and I had nothing to sport my Patriotism, I decided
to make something.
This idea is a great, not only for the 4th, but for summery tops
and workout tanks as well. After hours of roaming the floors of Forever 21 and
H&M, I found an oversized red-white-and-blue striped tee. Here’s how I went from
an oversized men’s tee to a cute fitted razor back tank:
You’ll need:
1) Any old tee
2) Pair of Scissors

Step 1) Grab an oversized tee. Funky Thrift store finds work great for this.

Step 2) Cut off the crew neck, sleeves, and 1-2” of the bottom seam.

Step 3) Turn the shirt to the back and cut in the sides of the straps to create a “razor back" appearance.
Step 4) Then cut a "V" down from the neck on the back of the tee.

Step 5) Take the bottom piece of the shirt you cut and remove the seam. Do this
by cutting and pulling the thread until you are left with one long stretchy piece of fabric.

Step 6) Pull and stretch the fabric – the longer the better, but make sure it doesn’t break. It should end up looking like a long spaghetti noodle.
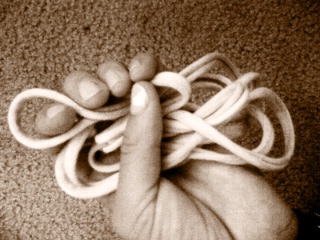
Step 7) With the noodley fabric tie a knot 2” above the base of the “V” on the back.
Wrap the fabric around the straps, until you completely cover the bottom 2” of the
straps. Then tie two knots to secure the fabric to the straps.

Voila! You can now sport this top to your next yoga class, the beach, or any other festivities you have this summer!
I got a shirt at the thrift store that is a large mens, aaaand I am going to try making this this weekend! yay!
ReplyDeleteYeah! I'm so glad you are trying this project, it's so fun! :)
ReplyDelete